Out of Office for Calendar
Google Calendar has added an “Out of Office” option as a new way to mark time on your calendar. This feature will allow you to block off either full days or select hours within a day (whichever you choose), and during that blocked off time it will automatically decline meeting invitations for you.
Calendar will also auto-decline currently existing meetings that appear during that time frame, so if you have any recurring meetings you do not need to remove them by hand. It should retain anything you have personally added to your calendar. Depending on your calendar settings, events that are auto-declined may stay visible on your calendar, but will change in appearance to note that they have been declined. They will appear with a white background with the text and outline color of whatever color is currently set.
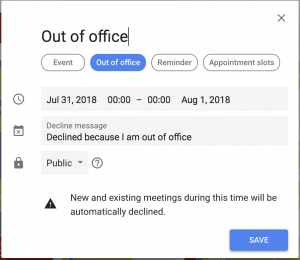
Below is a screen capture of the new feature:

The default decline message is shown in the image (“Declined because I am out of office”), but you can change that message to say what you need. Whatever you change it to will be saved for the next time you use the feature.
You can also choose to make the visibility of the status Public, Default Visibility, or Private. Here is a description of what it means to set each of these:
- Public events are visible to anyone who can view your calendar or who has an invite to your event.
- Events with default visibility follow the default settings in your calendar’s access permissions.
- Private events are hidden from everyone unless they have an invite or have access to make changes to your calendar.
You can also access these descriptions by clicking on the question mark next to the drop down.
This feature is not currently linked to Gmail’s Out of Office responder, so if you would like to set both you will have to do so individually.
Working Hours for Calendar
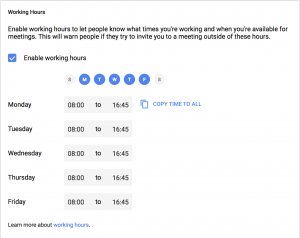
Previously, Calendar let you restrict hours to not show you weekends and to not show you late night and early morning hours for the weekdays. Now Calendar has expanded on that feature to allow you to be able to set specific times for each day of the week where you are available to accept meetings.
Enabling Working Hours will not block others from being able to send you meeting invitations that fall outside of the hours you have set, but it will give that individual a warning that they are inviting you to a meeting that falls outside of your Working Hours.
Below is a screen capture of this new feature:

Calendar may use your scheduling habits to preconfigure a list of Working Hours. In this case, you may be prompted by Calendar to review the hours it selected for you. From here you can choose to edit the hours, or to not set the feature at all. If you did not get this prompt, or had chosen to not set it at the time, you will find this new feature in Settings.
- Go to the Gear icon at the top-right of your Calendar and Choose “Settings.”
- On the left-hand side, under the “General” section is a “Working Hours” section.
- Once you click on “Working Hours” you will be taken directly to a field you can edit.
You may select as many days as you need to set hours for. For every day you have selected you will be able to individually set the start and end times for your Working Hours. If your hours are the same throughout all of the days you have selected, you can set the first day at the top of the list and use the “Copy time to all” link to the right of that to copy and paste that time to the rest of your list.
Everyone Else Has Declined Your Event
Calendar now makes it easier to tell when you need to reschedule an event when all of your guests had to decline. If you create an event with guests and all of your guests have declined, Calendar will alter the coloring of event and add a flag to it. The event will become white with text and outline in the color you have chosen for that calendar and before the event name you will see an exclamation point icon.
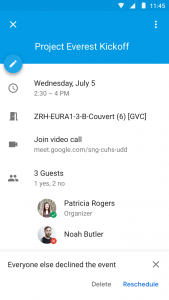
When you click on the event to see the popup with details it will inform you that all guests have declined and give you the option to reschedule the event or cancel the event.
Below is a screen capture of the feature:

What if you still have to attend the event? Even if no one else is available to? Instead of choosing Delete or Reschedule you can simply click the “X” in the top-right corner of the decline event notification. It will remove the flag from your event, but leave the event on your calendar.
For more information about these features you can visit Google’s official G Suite Updates Blog for the Out of Office and Working Hours and their official G Suite Updates Blog for when everyone has decline your event.

